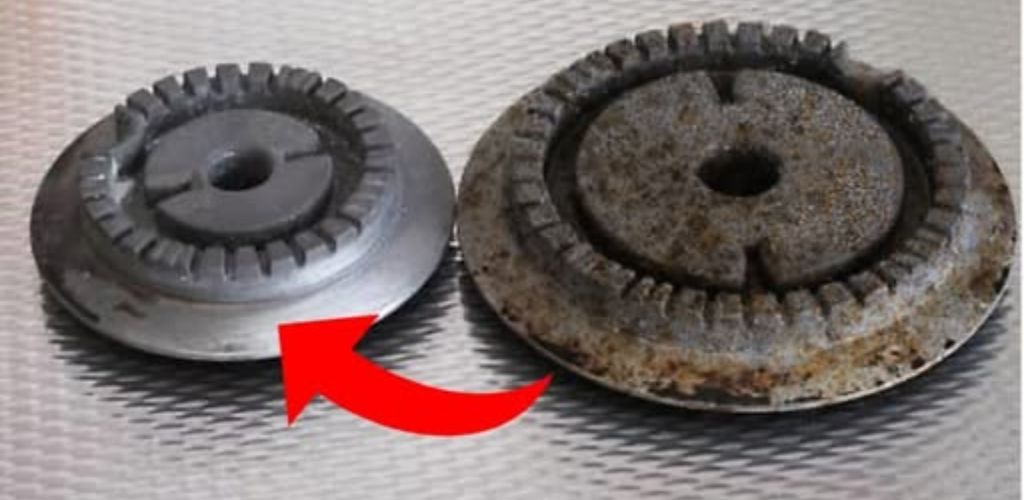
Keeping gas stove grates clean can be a real challenge, especially when there’s grease and burnt-on food residue. But don’t worry, there are proven methods you can use to effortlessly clean your gas stove grates and leave them looking like new again! The secret often lies in soaking time and the right cleaning agents.
Clean Gas Stove Grates Effortlessly: Step by Step to Shine
Here are the most effective methods, from gentle to powerful, to get your grill grates sparkling again.
Method 1: The Proven Overnight Soak (The Easiest Method)
This is often the best and most gentle method, as it does most of the work for you.
Preparation: Remove the grates from the stove. Scrape off any large food residue with a spatula or old brush.
Soaking:
In the Sink: Close the sink and place the grates in it. Fill the sink with very hot water and add a generous amount of dish soap or dishwasher tablets (1 to 2 tablets that dissolve). You can also add a little vinegar or baking soda for added effectiveness.
In a large trash bag: If the grates are too large for your sink, place them in a heavy-duty trash bag. Pour hot water and cleaning products (detergent/tablets) inside, making sure the grates are completely covered. Seal the bag tightly and place it in the bathtub to prevent leaks.
Soaking time: Soak the grates for at least 4 to 8 hours, or ideally overnight. The combination of hot water and cleaner will dissolve burnt-on grease and food residue.
Clean and rinse: The next morning, you’ll see that the dirt has dissolved. Now you can easily clean the grates with a stiff-bristled brush (don’t use steel wool, which can cause scratches!), an abrasive sponge, or even an old toothbrush to clean the crevices. Rinse well under running water and dry completely.
Method 2: Baking Soda and Vinegar (Nature’s Powerful Combination)
This method is environmentally friendly and very effective for removing burnt-on dirt.
Soak the grates: Place the grates in the sink or a large tub. Wet them completely with water.
Apply baking soda: Sprinkle baking soda generously over all the dirty areas of the grates. Make sure to create a good layer.
Add vinegar: Spray the baking soda with white vinegar (or diluted vinegar). It will foam and fizz—this is the chemical reaction that loosens the dirt.
Let it sit: Let the mixture sit for at least 30 minutes to several hours. For stubborn stains, you can also let it sit overnight. Scrub and rinse: Scrub the grates with a brush or abrasive sponge. The dirt should come off more easily. Rinse well and dry.
Method 3: Ammonia (Caution advised, but very effective)
Ammonia is extremely effective on heavily burned-on residue, but should be used with extreme caution and good ventilation.
Preparation: Place the grill grates in a large, heavy-duty garbage bag.
Add ammonia: Pour about 1 cup of pure ammonia (not a cleaner with added ammonia) into the garbage bag. It’s important not to pour the ammonia directly onto the grates, but simply pour it into the bag so the vapors can act. Work outdoors or in a well-ventilated area!
Seal and let it sit: Seal the garbage bag tightly to prevent vapors from escaping. Leave it to sit overnight or for at least 12 hours. The ammonia vapors will dissolve the grease and grime without scrubbing. Clean and rinse: Open the bag outdoors, remove the grates, and rinse them thoroughly with water. The dirt should come off naturally. You may only need a light brush. Important: Wear gloves and avoid inhaling the fumes.
Important tips for a shiny finish:
Regular cleaning: The more often you clean your grill grates, the easier it will be. Don’t wait until thick layers build up.
No steel wool: Avoid steel wool or abrasive cleaners, which can scratch the surface of the grates and make them more susceptible to new buildup.
Drying: Always dry the grates completely after cleaning to prevent rust from forming.
Protection: After cleaning, you can lightly rub the grates with a little cooking oil. This will protect them from rust and make the next cleaning easier.
With these methods, your gas stove grates will soon be as good as new and ready to use!